Thursday, September 29, 2011

AS2: Health Bar

Source file available at: http://adf.ly/2xrNS

Welcome to Tutorial #4 on how to create a health bar in flash using AS2!

We will will work with dynamic text box variables and the _xscale command.

Let's start off by starting a new AS2 document in Flash.
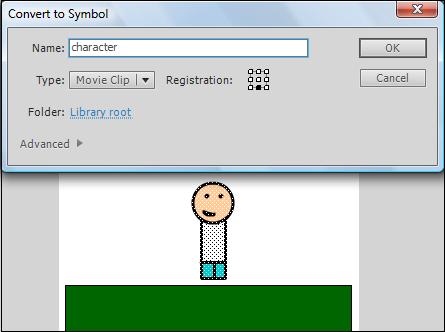
First, draw your HpBar and convert it to a symbol by selecting it and hitting F8 on your keyboard.
I am naming my health bar, "hpBar". Put the registration point where you want the bar to compress down. For example, putting the reg point on the left center block will make the hpBar compress to the left when health is running out. No instance name is required for this tutorial.


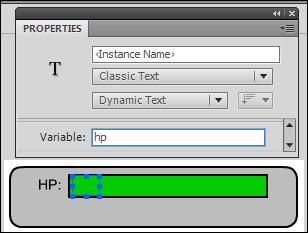
Next, we need to create a Dynamic text box.
Give the text box a Variable name of "hp".


After that, go to the frame you are on, open its actions, and type:
hp=100;
"100" is how much health you want your player to have.

Now let's click on our hpBar movie clip, and open its actions. Type this:


onClipEvent(enterFrame){
this._xscale = _root.hp*(100/100)
        //keep the hpBar 100% to scale no matter how much health I have.
if(_root.hp<=0){
        //if the health is lower than 0, then make the hp text 0.
_root.hp=0;
}

         if(_root.hp>=100){
        //if the health is higher than 100, then make the hp text 100. _root.hp=100;
}

}


In the second line of this coding, look at "_root.hp*(100/100)"
The red 100 is required for a 100% scale hpBar. So keep this number.
The blue 100 is your maxHp. Change this to the highest amount of health the player can have.

Last thing we need to do is create a custom way for a player to lose health. As practice I will just create a simple button that once clicked, will decrease the health by a random amount. You can use your imagination to what way you want your player to lose health since I can't cover all of them. Anyways, I am creating my button and putting these actions on it:


on(release){
_root.hp-=random(10);
        //the 10 is the highest number of damage you want to cause.
}


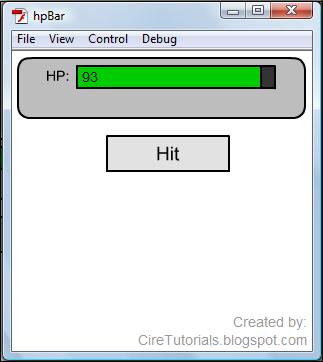
So once you test your movie, you should be able to lose health randomly! This concludes our tutorial and I hope it helped you! Feel free to download the source file for this tutorial.

Source file available at: http://adf.ly/2xrNS

Tuesday, September 27, 2011

AS2: Score System

Source code for this tutorial is available at: http://adf.ly/2vt0t

Welcome to Tutorial #3! In this tutorial I will teach you how to create your own customizable scoring system for your games.

Let's get started by opening up a new document in Actionscript 2.0
First, create your character movie clip. So draw a shape for your character a call it "character". The registration point does not entirely matter. Once you have a movie clip called "character", give it an instance name "char". Don't forget to give the character it's movement actions! If you need the code to move the character, go here: http://ciretutorials.blogspot.com/2011/09/as2-arrow-keywasd-movement.html


*Hint: You can give instance names through the properties panel.


There are many different ways to utilize a scoring system. In this tutorial I will show you how to collect coins to increase your score. So create an instance of a coin on the stage. Convert it to a movie clip, and call it "coin". Once again, registration point does not matter. You do not need to give the coin an instance name. You can now make duplicates of the coin anywhere you want on the stage.

Next, go into the coin movie clip. Select the shape inside the movie clip and convert it to another movie clip called "coin_child".


Once you have created the child movie clip inside of the parent coin movie clip, open up the coin_child's actions and type:

onClipEvent(enterFrame){
if(_root.char.hitTest(this._parent)){
unloadMovie(this._parent);
_root.score+=1;
}
}

unloadMovie(this._parent) means, if the character hits the coin, then delete the movie clip.

Now we just need to set up the score textbox that lets the player know what their score is. Simply create
a new dynamic textbox on the stage, and give it a variable name of "score".


*Hint: While Instance Names deal with movie clips and text in textboxes, Variable Names are used to deal with numbers such as score, health, distance etc.

Finally, the last piece of code you need, goes in the main timeline frame:
score=0;
This sets the score to be 0 at the beginning of the game.


Well, that concludes Tutorial #3 on Scoring Systems! Hope this helped! Thanks for viewing

Source code is available here: http://adf.ly/2vt0t

AS2: Gravity

Source code available at: http://adf.ly/2vrFM


Welcome to Tutorial #2! In this tutorial, I will show you how to program your characters in your game to respond to gravity. By the end of this tutorial, your character should be able to jump with either the space bar or "W".

Let's get started  by creating a new flash document. Select "AS2" as the programming language.

First off, let's make a movie clip for our character:


Notice how the registration point is at the bottom center square. This is where we want the character to react with the ground.

Next, we need to create the ground movie clip.


After you have created 2 movie clips (character and ground), give the ground an instance name of "ground". You can find this option in the properties panel.


Now you are ready for the code. Enter the following code into the actions of your "character" movie clip:


onClipEvent(load) {
falling=false;
hitting=false;
gravity=10;
speed=6;
jump=0;
jumping=false;
}
onClipEvent(enterFrame) {
if(!_root.ground.hitTest(this._x, this._y, true) && !jumping) {
_y+=gravity;
gravity=10;
falling=true;
}
if(Key.isDown(Key.SPACE) && jumping==false) {
jumping=true;
}
if(jumping) {
this.gotoAndStop("jump")
this._y-=jump;
jump-=1.7;
if(jump<0) {
falling=true;
}
if(jump<-15) {
jump=-15;
}
}
if(_root.ground.hitTest(this._x, this._y, true) && falling) {
jump=12;
jumping=false;
falling=false;
}
}


If you would like to edit the gravity, simply edit the following:
jump-=1.7;
Increasing the number in this variable will make the character jump lower.

If you would like to use the "W" key instead of the Space Bar, change this:
if(Key.isDown(Key.SPACE) && jumping==false) {
To:
if(Key.isDown(87) && jumping==false) {


Well, that concludes today's tutorial on gravity! Feel free to download the source file for this
tutorial: http://adf.ly/2vrFM

Monday, September 26, 2011

AS2: Arrow Key/WASD Movement

Welcome to Tutorial #1, in this tutorial, I will show you how to make a character or a simple movie clip in your game move using the arrow keys and/or WASD.

First off, lets create a new document.
Select AS2 as the programming language.
Draw your character.
Once you have finished drawing your character select the entire shape, and
press F8 to convert it to a movie clip.
When prompted, give the movie clip a name such as "character" or "player" and
for the registration point, keep it in the center of the 9 squares.

*Hint: The registration point is basically the point of rotation. So in this case,
it is the center


After hitting "OK", open up the actions of the new movie clip by either pressing
F9, or right clicking it and selecting "Actions".

In the actions, type:

onClipEvent(load){
speed=4;
}
onClipEvent(enterFrame){
if(Key.isDown(Key.RIGHT)){
this._x+=speed;
}

if(Key.isDown(Key.LEFT)){
this._x-=speed;
}
if(Key.isDown(Key.UP)){
this._y-=speed;
}

if(Key.isDown(Key.DOWN)){
this._y+=speed;
}

Let's take a look at what this code means:


onClipEvent(load){
speed=4;
}


This means, increase the players coordinate values by 4 when any of the buttons are pressed.


onClipEvent(enterFrame){
if(Key.isDown(Key.RIGHT)){
this._x+=speed;


The first line opens up the basic Movie Clip start action function that repeats the action again and again
The second line checks to see if the right arrow key is pressed.
The third line says that if the right key is pressed, then increase the "x" coordinates on the stage by whatever the speed variable is. In this case "speed" is set to 4 pixels per frame.
The other keys are basically the same, just going in different directions:

this._x+=speed;
Right Key
this._x-=speed;
Left Key
this._y-=speed;
Up Key
this._y+=speed;
Down Key


Now, you are all done with arrow keys. But what if you want to use WASD to control the player? Simply change one piece of the coding:

When on the arrow key function, you use this:

if(Key.isDown(Key.RIGHT)){


On WASD function, you use this:

if(Key.isDown(68)){


So pretty much, the code for a letter or number on the keyboard is a number value. You can check number
values by visiting:
http://people.uncw.edu/tompkinsj/112/flashactionscript/keycodes.htm

Well, that's all for Tutorial #1! Thank you for reading and I hoped this helped you!