Thursday, December 13, 2012
Multiplayer Flash Games (Introduction)
Ever wanted to make a multiplayer flash game? Well here's how.
http://www.smartfoxserver.com/
50 Likes = Multiplayer Game Tutorial Series!

Monday, December 3, 2012
Flash: Health Bar Animation Effect!
Download Source: http://adf.ly/FYo0z
In this tutorial, you'll learn to make a smooth animation for your health bar when you take damage or gain health.
Saturday, November 17, 2012
Flash - Make a High Score Leaderboard!
Download Source Here: http://adf.ly/Ewo8u
Need a leaderboard for your game? In this tutorial, you'll learn how to make your very own local leaderboard to keep track of your most skilled players who play your game!
Thursday, November 15, 2012
How to play ANY Flash game on Android devices!
Ever wanted to play a flash game on your mobile Android device? Well here is a simple way that allows you to play any .swf files like games or animations on your device!
Tuesday, November 13, 2012
Flash Game Tutorial - Final Fantasy (Part 3)
Download Source Here: http://adf.ly/EjDRL
In this series, we will create the final fantasy speed art game i made a few videos back. In this part, we will finish our turn based battle system. This concludes our Final Fantasy game tutorial series!
Watch the speed art version of the game here: http://bit.ly/Rv3Uh0
You'll also be able to download the more elaborate version of the source there as well.
In this series, we will create the final fantasy speed art game i made a few videos back. In this part, we will finish our turn based battle system. This concludes our Final Fantasy game tutorial series!
Watch the speed art version of the game here: http://bit.ly/Rv3Uh0
You'll also be able to download the more elaborate version of the source there as well.
Thursday, November 8, 2012
Flash Game Tutorial - Final Fantasy (Part 2)
Download Source Here: http://adf.ly/EWD6B
In this series, we will create the final fantasy speed art game i made a few videos back. We will start setting up our turn based battle system which will be continues in part 3.
Watch the speed art version of the game here: http://bit.ly/Rv3Uh0
You'll also be able to download the more elaborate version of the source there as well.
Friday, November 2, 2012
Flash Game Tutorial - Final Fantasy (Part 1)
Download Source Here: http://adf.ly/EGwXV
In this series, we will create the final fantasy speed art game i made a few videos back. We will learn setting up tile based system, although a more elaborate tutorial is located here: http://bit.ly/Tpj6IE
Watch the speed art version of the game here: http://bit.ly/Rv3Uh0
You'll also be able to download the more elaborate version of the source there as well.
Wednesday, October 31, 2012
Flash Game Tutorial - Tile Based Games (Part 4)
Download Source Here: http://adf.ly/EEp56
In this tutorial, we will continue our tile based game by allowing the player to move to different rooms/maps when they move off the screen
Thursday, October 25, 2012
Flash Game Tutorial - Tile Based System (Part 3)
Download Source Here: http://adf.ly/E2niw
In this tutorial, we will continue our tile based game by adding wall collision with the player to make sure they can't go through any tiles we don't want them to.
Wednesday, October 24, 2012
Flash Game Tutorial - Tile Based System (Part 2)
Download Source Here: http://adf.ly/E0mhj
In this tutorial, we continue working with our tiled based system by giving our character tile to tile movement. Stick around for part 3!
Tuesday, October 23, 2012
Flash Game Tutorial - Tile Based System (Part 1)
Download Source Here: http://adf.ly/DydvW
In this tutorial, I show you how to set up a tile based system by making a "map" in the actions of the frame that imports each tile from the library and places it in the order that you want.
Sunday, October 21, 2012
Speed Art Game - Catacomb Flash
This is how far i got in 2 hours making "Catacomb Flash"
Play it here: http://adf.ly/Dta1v
Catacomb Flash is a flash version remake of Mojang's "Catacomb Snatch" which involves a players spending resources to get towers that defend a cart that transfers portions of the center tower back to home base to score points.
Music:
Saint - MrBangJung
Monday, October 15, 2012
Flash Game Tutorial - Pokemon
Download the source used in this video here: http://adf.ly/DjR0D
This video will get you started in making your own Pokemon game, as demonstrated in my speed art game video which can be found here: http://www.youtube.com/watch?v=pigkp3SbegE
Play the speed art version of the game here: http://adf.ly/CdwUb
You'll also be able to download the more elaborate version of the source there as well.
Thursday, October 11, 2012
Speed Art Game - War Strategy Game
This is how far I got in 2.24 hours making a War Strategy Game
Play it here: http://adf.ly/DbN9f
Please PM me for game suggestions for my next video!
Music:
Still Alive - Mt Eden Dubstep
Play it here: http://adf.ly/DbN9f
Please PM me for game suggestions for my next video!
Music:
Still Alive - Mt Eden Dubstep
Monday, September 17, 2012
Speed Art Game - Final Fantasy
This is how far I got in 2 hours making a Final Fantasy game. Updates to be expected soon!
Play it here: http://adf.ly/CuPmL
I also need help making an intro and outro for these videos. If you are interested, please PM me!
Music:
Eternity - MrBangJung (http://www.youtube.com/watch?v=wE7Ui2UPvp0&feature=plcp)
Friday, September 7, 2012
Speed Art Game - Pokemon... Attempt
This is how far I got in 2 hours making a Pokemon tile based game. Updates to be expected soon!
Play it here: http://adf.ly/CdwUb
I also need help making an intro and outro for these videos. If you are interested, please PM me!
Music:
The First Time (Evolving) - ApproachingNirvana
Thursday, August 30, 2012
Speed Art Game - Card Game
This is how far I got in 2 hours making a card battle game.
Play it here: http://adf.ly/CPCLV
I also need help making an intro and outro for these videos. If you are interested, please PM me!
Music:
Aurora - ApproachingNirvana
Monday, April 2, 2012
AS2: Save Data
Source file available here: http://adf.ly/6xzBr
Welcome! In this tutorial, I will show you how to save data such as variables, text box data, char positions, and much more! This is handy if you need a "Save Game" option.
Alright, to get started, open up a new AS2 document.
First, make a button symbol. Call it "saveBtn". No instance name required.
Then, make another button. Call it "loadBtn". Still, no instance name.
Now for this tutorial, I will show you how to save a player's position on the screen.
So go ahead an create a character and name it "charMc". Give it an instance name of charMc.

Now, let's make the character move with the arrow keys. Right click on our charMc movie clip and select "Actions". In the actions, type:
onClipEvent(load){
speed=3;
}
onClipEvent(enterFrame){
if(Key.isDown(Key.RIGHT)){
this._x+=speed;
}
if(Key.isDown(Key.LEFT)){
this._x-=speed;
}
if(Key.isDown(Key.DOWN)){
this._y+=speed;
}
if(Key.isDown(Key.UP)){
this._y-=speed;
}
}
That is all the coding we need for charMc. All we have to do now, is enter in save and load actions in the buttons. In the "saveBtn" button, type:
on(release){
_root.pos = SharedObject.getLocal("tutorial");
_root.pos.data.charMc_x = _root.charMc._x;
_root.pos.data.charMc_y = _root.charMc._y;
}
And in the "loadBtn" button, type:
on(release){
_root.pos = SharedObject.getLocal("tutorial");
_root.charMc._x = _root.pos.data.charMc_x;
_root.charMc._y = _root.pos.data.charMc_y;
}
And that's it!
On the first line of the save and load code, we are making a new cookie that will be stored locally on the player's computer. Next line on the save code, we call the "charMc_x" and "charMc_y" variables to store the player's position. In the load button, we search for that variable in the cookie and display it. If you wanted to save the score, you could use this in the save button:
_root.pos.data.score = _root.score;
And then in load button, just flip it around!
Hope this tutorial was helpful!
Source file available here: http://adf.ly/6xzBr
Welcome! In this tutorial, I will show you how to save data such as variables, text box data, char positions, and much more! This is handy if you need a "Save Game" option.
Alright, to get started, open up a new AS2 document.
First, make a button symbol. Call it "saveBtn". No instance name required.
Then, make another button. Call it "loadBtn". Still, no instance name.
Now for this tutorial, I will show you how to save a player's position on the screen.
So go ahead an create a character and name it "charMc". Give it an instance name of charMc.

Now, let's make the character move with the arrow keys. Right click on our charMc movie clip and select "Actions". In the actions, type:
onClipEvent(load){
speed=3;
}
onClipEvent(enterFrame){
if(Key.isDown(Key.RIGHT)){
this._x+=speed;
}
if(Key.isDown(Key.LEFT)){
this._x-=speed;
}
if(Key.isDown(Key.DOWN)){
this._y+=speed;
}
if(Key.isDown(Key.UP)){
this._y-=speed;
}
}
That is all the coding we need for charMc. All we have to do now, is enter in save and load actions in the buttons. In the "saveBtn" button, type:
on(release){
_root.pos = SharedObject.getLocal("tutorial");
_root.pos.data.charMc_x = _root.charMc._x;
_root.pos.data.charMc_y = _root.charMc._y;
}
And in the "loadBtn" button, type:
on(release){
_root.pos = SharedObject.getLocal("tutorial");
_root.charMc._x = _root.pos.data.charMc_x;
_root.charMc._y = _root.pos.data.charMc_y;
}
And that's it!
On the first line of the save and load code, we are making a new cookie that will be stored locally on the player's computer. Next line on the save code, we call the "charMc_x" and "charMc_y" variables to store the player's position. In the load button, we search for that variable in the cookie and display it. If you wanted to save the score, you could use this in the save button:
_root.pos.data.score = _root.score;
And then in load button, just flip it around!
Hope this tutorial was helpful!
Source file available here: http://adf.ly/6xzBr
Sunday, April 1, 2012
I'm Back!
Sorry for the lack of tutorials!
I was designing a game for a state competition. Now that it's over, it's time for some amazing tutorials! Be ready for constant weekly updates :]
-Eric
I was designing a game for a state competition. Now that it's over, it's time for some amazing tutorials! Be ready for constant weekly updates :]
-Eric
Saturday, October 22, 2011
AS2: Shop System
Source file available here: http://adf.ly/3LnLS
Welcome! Today I will be showing you how to create a shop system in your flash games with the use of ActionScript 2.0.
Let's start by creating a new AS2 Flash document.

For this tutorial, you will only have 4 things in your library. 3 of the 4 are buttons named "item1", "item2", and "item3". The other thing is also a button named "purchase_btn". You will need to create these now. Just select each item individually, and convert them to a symbol (button) by pressing F8 on your keyboard or right clicking them and selecting "Convert to Movie Clip".

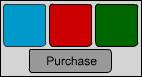
The picture above are the 3 items I created, and my purchase button. You are now done with making the library items.
Now we need to add several Dynamic text boxes. There are 7 total for this tutorial.
Here is a list of the ones you will need and their Instance Names or Variables. The ones highlighted in blue are Variable Names, and the ones in red are Instance Names.
Money - "money"
Cost of Item - "cost"
The Item's Name - "itemName"
Shop Message - "msg"
Amount of Blue Squares - "blueSquares"
Amount of Red Squares - "redSquares"
Amount of Green Squares - "greenSquares"
Here is a visual display of the textboxes:
Do not put any text inside the textboxes, I just wanted to make it clear which ones were which.

Now that we have named our Dynamic textboxes, we can start adding code.
In the first frame, we need to determine how much money we want to start out with, and how many of
each item we have in our inventory. So in the frame's actions, type this:
money=100;
blueSquares=0;
redSquares=0;
greenSquares=0;
We have now set what we want for each value. Now we need to add coding that lets us purchase items. On the purchase button, type this:
Let's take a look at what this means:
if(_root.itemName.text=="Blue Square" && _root.money>=10){
_root.money-=10;
_root.blueSquares+=1;
_root.msg.text="You have bought 1 Blue Square."
}
Each of these "if" statements is checking to see if 1, we have selected the Blue Square item as indicated by the "itemName" textbox, and 2, if we have enough money to purchase the item.
You will notice that after each "if" statement, there is an "else" action. This means that, if the function above is false, (if we do not have enough money/item not selected) then check for this function, and if this function is not true, check the next function.
if(_root.itemName.text=="Please select an item."){
_root.msg.text="You have not chosen an item!"
}else{
_root.msg.text="You don't have enough money!";
}
The "if" statement here is saying that if we have not selected an item at all, let the user know that he/she has not selected an item from the shop.
The last line is the last function that is checked, that lets the user know that they do not have enough money to purchase the item.
The last coding we need is simple, we just need to be able to click on an item and display the cost and name of it. For each item, type this:
on(release){
_root.cost=10;
_root.itemName.text="Blue Square";
}
You can change the cost and name to whatever you want, but make sure that the "itemName.text" matches the same text you put in the coding for the purchase button.

That does it! If you need help understanding the code or anything dealt with in this tutorial, please download the source file. It will help you! Thanks for viewing this tutorial!
Source file available here: http://adf.ly/3LnLS
Welcome! Today I will be showing you how to create a shop system in your flash games with the use of ActionScript 2.0.
Let's start by creating a new AS2 Flash document.

For this tutorial, you will only have 4 things in your library. 3 of the 4 are buttons named "item1", "item2", and "item3". The other thing is also a button named "purchase_btn". You will need to create these now. Just select each item individually, and convert them to a symbol (button) by pressing F8 on your keyboard or right clicking them and selecting "Convert to Movie Clip".

The picture above are the 3 items I created, and my purchase button. You are now done with making the library items.
Now we need to add several Dynamic text boxes. There are 7 total for this tutorial.
Here is a list of the ones you will need and their Instance Names or Variables. The ones highlighted in blue are Variable Names, and the ones in red are Instance Names.
Money - "money"
Cost of Item - "cost"
The Item's Name - "itemName"
Shop Message - "msg"
Amount of Blue Squares - "blueSquares"
Amount of Red Squares - "redSquares"
Amount of Green Squares - "greenSquares"
Here is a visual display of the textboxes:
Do not put any text inside the textboxes, I just wanted to make it clear which ones were which.

Now that we have named our Dynamic textboxes, we can start adding code.
In the first frame, we need to determine how much money we want to start out with, and how many of
each item we have in our inventory. So in the frame's actions, type this:
money=100;
blueSquares=0;
redSquares=0;
greenSquares=0;
We have now set what we want for each value. Now we need to add coding that lets us purchase items. On the purchase button, type this:
on(release){
if(_root.itemName.text=="Blue Square" && _root.money>=10){
_root.money-=10;
_root.blueSquares+=1;
_root.msg.text="You have bought 1 Blue Square."
}else
if(_root.itemName.text=="Red Square" && _root.money>=20){
_root.money-=20;
_root.redSquares+=1;
_root.msg.text="You have bought 1 Red Square."
}else
if(_root.itemName.text=="Green Square" && _root.money>=30){
_root.money-=30;
_root.greenSquares+=1;
_root.msg.text="You have bought 1 Green Square."
}else
if(_root.itemName.text=="Please select an item."){
_root.msg.text="You have not chosen an item!"
}else{
_root.msg.text="You don't have enough money!";
}
}
_root.money-=10;
_root.blueSquares+=1;
_root.msg.text="You have bought 1 Blue Square."
}
Each of these "if" statements is checking to see if 1, we have selected the Blue Square item as indicated by the "itemName" textbox, and 2, if we have enough money to purchase the item.
You will notice that after each "if" statement, there is an "else" action. This means that, if the function above is false, (if we do not have enough money/item not selected) then check for this function, and if this function is not true, check the next function.
if(_root.itemName.text=="Please select an item."){
_root.msg.text="You have not chosen an item!"
}else{
_root.msg.text="You don't have enough money!";
}
The "if" statement here is saying that if we have not selected an item at all, let the user know that he/she has not selected an item from the shop.
The last line is the last function that is checked, that lets the user know that they do not have enough money to purchase the item.
The last coding we need is simple, we just need to be able to click on an item and display the cost and name of it. For each item, type this:
on(release){
_root.cost=10;
_root.itemName.text="Blue Square";
}
You can change the cost and name to whatever you want, but make sure that the "itemName.text" matches the same text you put in the coding for the purchase button.

That does it! If you need help understanding the code or anything dealt with in this tutorial, please download the source file. It will help you! Thanks for viewing this tutorial!
Source file available here: http://adf.ly/3LnLS
Subscribe to:
Posts (Atom)